extensions

Sample
Product: Comment System
In the majority of websites, the most important part is the information that they contain and the degree of impact that this information achieves in its users. This is the reason why many websites transform their users into co-authors by allowing them to add comments where they can evaluate, complete, or in other ways react to the information of the webpage or related article.
Collecting user comments, representing them in an appealing way on the related webpage, managing them to remove comments that do not comply with the website policy, is a highly complicated task.
Comment System is an extension for Adobe Dreamweaver MX or later, that allows to easily insert a comment submission form into your webpage, visualize previously added comments, manage comments submitted on your website's different pages, and eliminate comments that do not match your website's policy.
The requirements for Comment System are as follows:
Help & FAQ & Videos
Please, check this Comment Sytem Demo (Animated Flash/Video)
Additional Info: Comment System - Online FAQ.
Basic Installation
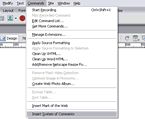
To install “Comment System”, simply execute the file SystemofComments.mxp or use Adobe Extension Manager.
Once the extension is installed, it can be accessed through the menu option “Commands > Comment System”.
Development Notes
To use the Comment System extension, your Dreamweaver-based website must be configured and the webpage where you wish to insert a Comment System must be saved.
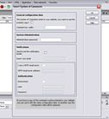
Click on the menu option “Comment System” (as explained under “Installation”). A setup window will open up, which will allow to prepare the Comment System to be inserted in the website.
If your website already has a Comment System on any of its pages, a checkbox will appear that will allow to use the same copy of the Comment System.Note: If you insert a new copy of the extension in your website, the one you used before will be overwritten and all previous setup data will be lost.
Comment Box Width: a whole number, that defines the width of the comment submission form, as well as the width of the box that will contain the comments on the webpage.
Administration password: select a password that you will use to enter the comment admin system.
Send me notification emails: this option must be selected if you wish to be notified of each of the comments entered in your webpages. The notification email will contain the submitted comment as well as the webpage address where the comment was entered.
Insert your email: enter here the email address where you want the notifications to be sent.
I use a SMTP email server: select this option if the webserver where your website is hosted uses a SMTP server for sending emails.
SMTP email server address: enter the location of your SMTP server.
Anonymous: mark this option if your SMTP server does not require authentication.
User: user name for authentication at the SMTP server (this field is only mandatory if your SMTP server requires authentication).
Password: password for authentication at the SMTP server (this field is only mandatory if your SMTP server requires authentication).
Note: if you are not sure of your email server parameters, please contact your hosting provider before adding a Comment System to your page.
A new folder – TE_CommentSystem - will be automatically created at the root of your website once you insert a Comment System. This new folder will contain all the necessary code for Comment System's correct functioning. It will also contain a folder named “db” (this folder must have writing permission), meant for the comment storage, and a folder named “admin”, with the code necessary for the administration of the comment system.
Note: because the “db” folder will have writing permission for creating a file for each webpage where a comment is added, each of these files will contain the comments submitted in the corresponding webpage.
To access the system admin of the comments please enter the following address: http://www.mywebsite.com/TE_CommentSystem/admin/SystemAdmin.php
(www.mywebsite.com depends on the name of your website)
The first thing you have to do when you wish to manage comments on your website is enter the password that you have selected in the setup window.
To manage the comments entered in the pages of your website, you must access the administration page: http://www.mywebsite.com/TE_CommentSystem/admin/SystemAdmin.php
(www.mywebsite.com depends on the name of your website)
Introduce the password that you selected in the setup window.
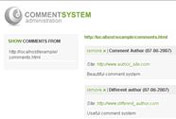
Once inside Admin, you can see on the left the list with all the pages that contain comments.
Once you select the page on the left, the comments of this webpage will be shown in the column on the right.
There is a button for elimination of each comment that belongs to a webpage. To delete a comment, simply click on that button, and after a confirmation dialogue, the comment will be eliminated.
To leave the Comment Admin, press Logout in the upper right corner.
Download Comment System
|
Preferred payment & download method:
|
|
|
Paypal or Credit Cards: |
PRICE
After payment you will be redirected to a direct-download page and the download link will be emailed to the payment address.
USD $29.99 |