extensions

Sample
Dreamweaver Link Calendar allows you to insert a calendar on your web pages and from a visual interface to link dates to web pages.
The links can be opened in a in the same window or in a new window.
Important note: With this extension you can associate "links" to the dates. If you want to associate mouseover information instead direct links we have another extension for that purpose, our Dreamweaver Visual Calendar. Note that these calendar extensions are different products.
Note: This extension is designed for servers with support for PHP scripts. If what you are looking for is an ASP based calendar then use our ASP Dreamweaver Link Calendar.
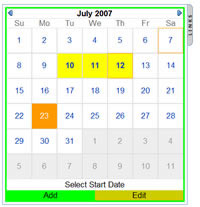
Here's an example of how your users could see the calendar, when you click a selected range of dates (yellow background) a new web site will be opened into a new tab/window:
You can easily and securely edit the calendar from a 100% visual interface, without any need for programming or HTML skills.
From the calendar administration you can:
Please check this video demo for a quick introduction on how to manage the calendar.
For your convenience, we have also provided an Administration Demo; you can try using the calendar yourself and see how easy it is.
Note: To see the administration changes applied into the "public" calendar above you must refresh this page.
Administration demo:Note: You can have as many calendars as you wish within one website.
IMPORTANT: This software has the following requirements:
Note: This software does not require any external database system. All the data are saved in text files on the server, which makes the requirements minimal and facilitates installation.
Optional requirements:
Help & FAQ & Videos
You will find details below in "Development Notes".
Please, check this animated demo to see exactly how you can use this extension.
Additional Info: Dreamweaver Link Calendar - Online FAQ.
Basic Installation
If you aren't using Dreamweaver then ignore the references to Dreamweaver below and follow the instructions specified into the "readme.txt" file located into the folder "Non-Dreamweaver version" (after unzipping the downloaded file). Basically just copy the files into your website.
To install in Dreamweaver, follow these steps:
For details check below the "Development Notes" section
For visual information, please check this video demo.
Development Notes
To insert a calendar into your web page, click on "Dreamweaver Menu >> Commands >> Insert Link Calendar" and this insertion dialog will appear:
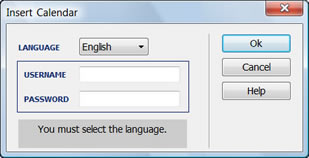
The fields to be completed mean the following:
You can create a different username and password for each calendar inserted in your website.
Keep in mind that you have to set writing permission for the folder "TDE_LinkCalendar/admin/database" and to the files inside it. To know more details about how to set writing permission please read the related entry in our FAQ. Also, you may normally contact your hosting provider in order to find out how to set writing permission on your server.
To insert/change/remove the links associated to dates go to the following address:
http://your-web-site/TDE_LinkCalendar/admin
...or, if the calendar has been installed in a subdirectory of your website:
http://your-web-site/subdirectory-1/subdirectory-2/...../TDE_LinkCalendar/admin
Inserting a Link: put the calendar in "ADD" mode (see a button under the calendar). Click on the first day of the date range to select and afterwards on the final day of the range; if you refer to just one day then click twice on the same day.
At the second click, a window will show up to add the link to be associated with the selected dates and the destination (target), for example to open the link in the same window or in a new window. Finally, simply click on "Save".
Changing a Link: Put the calendar in the "EDIT" mode. Click on the date you wish to edit and a window will show up to edit the associated link and target.
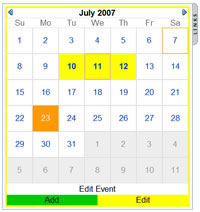
Removing a link: With the calendar in "EDIT" mode, once you select a date with an associated link, a Delete button will also appear allowing to remove the link.
Seeing selected dates: With the vertical button "Links", you can easily check the list of all the dates and associated links, be it of just one month or of the whole calendar.
To see the result, use your browser to open the page with the public calendar that can be seen by your website users ? that is, the page where you initially inserted it.
If you wish to modify colours, fonts, size and other calendar styles you can do it by editing Cascading Style Sheets files (.CSS) that define these parameters. These files can be found in these locations:
We recommend that you make a backup copy before modifying these visual styles.
Download Dreamweaver Link Calendar
|
Preferred payment & download method:
|
|
|
Paypal or Credit Cards: |
PRICE
After payment you will be redirected to a direct-download page and the download link will be emailed to the payment address.
USD $29.99 |