extensions

Dreamweaver ASP Appointment Calendar is an extension for Adobe Dreamweaver which allows you to book, show and edit appointments as well as create event calendars which show different activities throughout the day. For each day in the calendar you will be able to define which are the timeframes for appointments or activities, add information in the hours already booked or leave them free to allow a reservation later.
Examples of cases where this product can be recommended: booking/management of meetings / appointments for lawyers firms, doctors, veterinaries, beauticians, etc, as well as to show different activities during an event, a scholar calendar (ex, class planning), tourist group daily planner, and for virtually any kind of activity which is developed with specific schedule during the day.
This calendar is highly flexible, you can create periodical schedules (i.e., events each 20 minutes, or every hour), as well as changing schedules. You can define which days are open for business (ex, Monday to Friday), and also the exception days with no activities (holidays, planned interruptions, leaves.) For each booked schedule you can write a title and comments for reference. You can choose to show a monthly view of the calendar, or show several months simultaneously.
Note*: This product is for servers with ASP scripts support. We have the same product for servers with PHP support here: PHP Appointment Calendar.
Note**: This product uses plain text databases. If you are looking for a product based on MSAccess databases then check the ASP Appointment Calendar with Database.
The administration system of the calendar is extremely simple, with a very modern and interactive interface. To access a demo, please click on the links below:
On the public site, for your web visitors, you can show the calendar in three ways according to the use that you intend to give your calendar:
*Quick note: The demos on this page and visual tutorial here are PHP based because we have a similar extension for PHP server, however note that this ASP Appointment Calendar only requires ASP as server side script.
Tip: in the case of the appointment calendar, if you don't have a script that processes your reservation form to collect the data sent by the user, we can suggest any one of the following Dreamweaver extensions:
IMPORTANT: This software has the following requirements:
Note: This product does not require external database systems; the information is kept in text files in a folder on your website. This way the technical requirements are low while the installation and use are kept simple and straightforward.
Optional requirements:
Help & FAQ & Videos
Please read below the "Basic Installation" and "Development Notes".
For visual information, please consult the animated video-demo.
For a live sample please visit the following links:
Additional Info: ASP Appointment Calendar - Online FAQ.
Basic Installation
If you aren't using Dreamweaver then ignore the references to Dreamweaver below and follow the instructions specified into the "readme.txt" file located into the folder "Non-Dreamweaver version" (after unzipping the downloaded file). Basically just copy the files into your website.
To install in Dreamweaver, please follow these steps:
To install the product in your page:
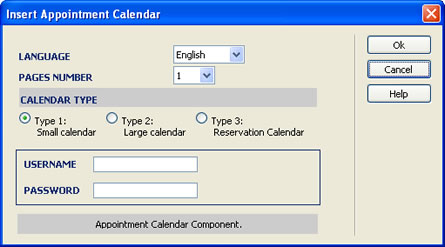
The window's fields are as follows:
Development Notes
The address from which you can manage your calendar is:
http://your-web-server/TDE_ASPAppCalendar/admin
or, if the calendar is not at the root of your website:
http://your-web-server/subfolder-1/subfolder-2/...../TDE_ASPAppCalendar/admin
Keep in mind that you have to set writing permission for the folder "TDE_ASPAppCalendar/admin/database" and to the files inside it. To know more details about how to set writing permission please read this entry in our FAQ.
Defining working days: Please mark the days that are available to add appointments, activities etc, as shown on this image:
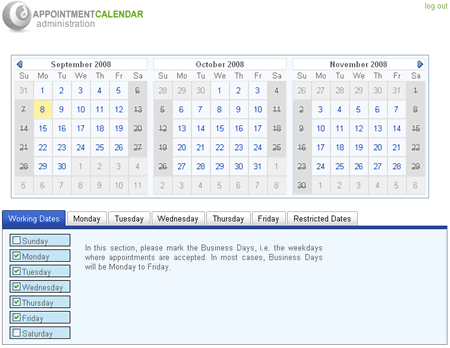
These days will be shown in the calendar as stricken through.
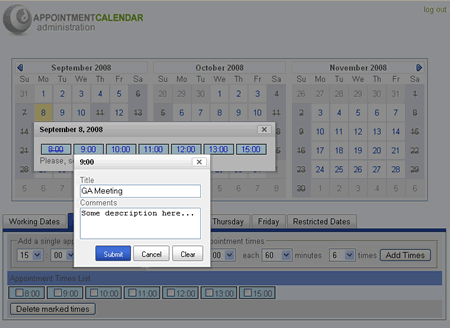
Defining appointment times: To define the time of appointments or activities, go to the day of the needed week (Monday, Tuesday...), where you will have the option to add each time independently (ex. Add Time at 8.00), or if you wish, you can generate, in one step, multiple appointment times for each interval (ex. add starting at 8 AM, every 30 minutes, 5 times; this will generate the sequence: 8.00, 8.30, 9.00, 9.30, 10.00). The following image shows both options:
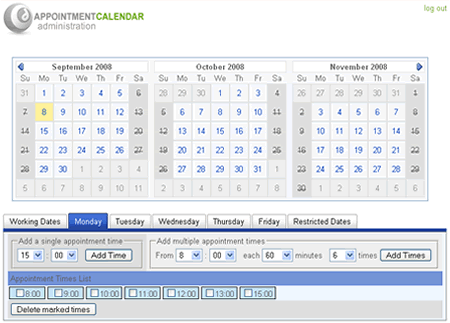
To delete times, mark them and use the button "Delete marked times"
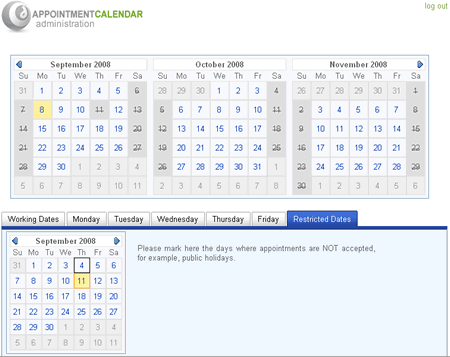
Adding restricted dates: Special days where no appointments or activities will be held, can be entered individually through this opton. Simply click on them to make them as "restricted" and if you wish to "un-restrict" them, simply click on them again. The following image shows the interface for these actions:
Adding information to the calendar: After defining the working days and the schedules you can use the calendar that appears in the upper part to add information on the activities that occupy the established times. For that, click on the desired day and the list of pre-defined times will be shown. Click on one of the times and a window will appear where you can enter the title of the activity / appointment and a description, as shown in the following image:
As you can see, all the work is realized on a single page, which is highly interactive, done in real time with comfortable effects based on modern dynamic scripts.
If you wish to modify colours, fonts, size and other calendar styles you can do it by editing Cascading Style Sheets files (.CSS) that define these parameters. These files can be found in these locations:
We recommend that you make a backup copy before modifying these visual styles.
Download ASP Appointment Calendar
|
Preferred payment & download method:
|
|
|
Paypal or Credit Cards: |
PRICE
After payment you will be redirected to a direct-download page and the download link will be emailed to the payment address.
USD $29.99 |