extensions

Sample
This Dreamweaver extension allows you to insert a calendar which can be used by your website visitors to select dates - for example, check-in and check-out dates - for a reservation.(Note: We also have an Advanced Reservation Calendar with more features.)
This calendar allows two selection types: "complete day" or "partial day". Complete day means that the first and the last days booked are charged as full days; Partial Day means that they are charged as half-days only. Partial Day system is widely used by hotels: guests are supposed to arrive and leave within a certain timeframe - the earliest check-in time and the latest check-out time; if these times are respected, the customer is charged half a daily rate for both the arrival day and the departure day, thereby matching the number of nights actually spent in the hotel. An example of such system is shown on this page.
This calendar can be used for all kinds of reservations: hotel bookings, tour bookings, various kinds of rentals: car, bike, motorcycle, office, jewellelery, cellphones, etc.
The calendar has an admin feature than allows you to block out certain dates, for example dates already booked or where bookings are not accepted for other reasons. Users cannot select the dates that have been blocked out.
Please note that the actual processing of the form, such as saving the form data in a database or sending them by email, is not included in this extension; however we can recommend you Dreamweaver extensions Form Mail or Form Excel by HotDreamweaver. These extensions can be used to process the form data after it has been submitted by your website visitors.
In most cases, you will also need to create fields for your booking form, such as Name, Contact information, etc; such fields are not included with the Reservation Calendar.
Also note that when a user selects certain dates for a booking, they are not automatically blocked out as "unavailable"; rather, this is an admin feature, and the person who takes care of bookings has to manually block out the desired dates.
Example of the admin (in the "partial day" mode)
When you add a blocked-out date, you can specify the reason. This feature can be useful if you wish to have a fast reference for each blocked-out date or period. The text entered as reason is an internal element, meant for admin purposes and is not shown to your website visitors. They only see that the date is unavailable for booking.
Note: to see the changes made in the calendar's admin, you need to refresh the page.
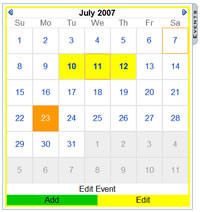
Example of a calendar with a reservation form, on a public site:
Note: click to select a starting date and click again to select the end date of the booking.
Note: This software does not requiere an external database system; only text files are used to save the dates blocked out by admin.
Optional requirements:
Help & FAQ & Videos
Read below in "Development Notes".
For visual information, please consult the animated demo.
Additional Info: Reservation Calendar - Online FAQ.
Basic Installation
If you aren't using Dreamweaver then ignore the references to Dreamweaver below and follow the instructions specified into the "readme.txt" file located into the folder "Non-Dreamweaver version" (after unzipping the downloaded file). Basically just copy the files into your website.
To install in Dreamweaver, follow these steps:
Development Notes
To insert a calendar, go to "Dreamweaver Menu >> Commands >> Insert Reservation Calendar", and the following image will show up:
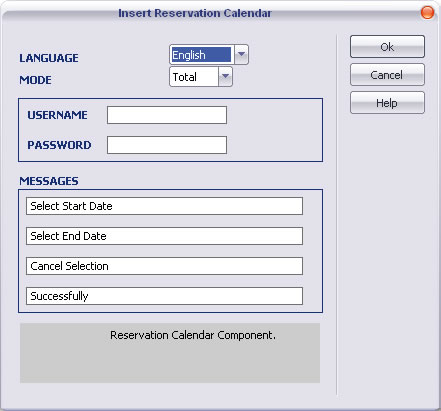
You will be asked to select:
Keep in mind that you have to set writing permission for the folder "TDE_RCalendar/admin/database" and to the files inside it. To know more details about how to set writing permission please read the related entry in our FAQ. Also, you may normally contact your hosting provider in order to find out how to set writing permission on your server.
To manage the blocked-out dates, access the admin using the following address:
http://your-web-site/TDE_RCalendar/admin
...or, if the calendar has been installed in a subdirectory of your website:
http://your-web-site/subdirectory-1/subdirectory-2/...../TDE_RCalendar/admin
To block out a date: put the calendar in "ADD" mode (see a button under the calendar). Click on the first day of the date range to select and afterwards on the final day of the range; if you refer to just one day then click twice on the same day. Note that the calendar in “partial day” mode does not accept a second click on the same date, so it will need to be the following day.
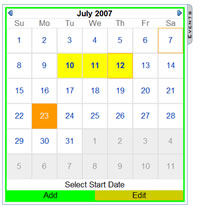
When you make the second click, a new window will be shown, which will allow to add a note - as additional information for yourself, in regard to these dates. (ex.: reference of a confirmed reservation made for these days).
To edit the note of a blocked date: put the calendar in the EDIT mode, click on a date in the period that you wish to edit and the window with the related information will be shown, - you can now modify it.
Deleting a blocked date: With the calendar in "EDIT" mode, once you select a date with an associated link, a Delete button will also appear allowing to remove the link.
Seeing selected dates: With the vertical button "Links", you can easily check the list of all the dates and associated links, be it of just one month or of the whole calendar.
To see the result in the browser, refresh the page where the form containing the calendar is located, i.e., the page where you originally inserted it.
Please note that the actual processing of the form, such as saving the form data in a database or sending them by email, is not included in this extension; however we can recommend you Dreamweaver extensions Form to Mail or Form to Excel, by HotDreamweaver. These extensions can be used to process (automatically) the form data after it has been submitted by your website visitors.
If you are writing by yourself the form's processing code, then you need to know that the calendar put the reservation dates into hidden fields to allow the selected data to be posted just like normal form's fields:
Then, to get those fields form a PHP code (example) you can use a code like this one:
<?php
// store the first date selected with the format YYYY-MM-DD
$startDate = $_POST["selYear_start1"]."-".$_POST["selMonth_start1"]."-".$_POST["selDay_start1"];
// store the second date selected with the format YYYY-MM-DD
$endDate = $_POST["selYear_end1"]."-".$_POST["selMonth_end1"]."-".$_POST["selDay_end1"];
?>
If you wish to modify colours, fonts, size and other calendar styles you can do it by editing Cascading Style Sheets files (.CSS) that define these parameters. These files can be found in these locations:
We recommend that you make a backup copy before modifying these visual styles. You can read more about these changes in the FAQ.
Download Reservation Calendar
|
Preferred payment & download method:
|
|
|
Paypal or Credit Cards: |
PRICE
After payment you will be redirected to a direct-download page and the download link will be emailed to the payment address.
USD $29.99 |