extensions

Sample
The demo of the Comment System has:
Comments
Comments
Comments
Comments
Comments
Product: Comment System + Reviews Bubble
Comments made by website users are very important in the development of a web project, they allow the website to gather feedback which helps webmasters to improve it and reach more users. The means with which the comments are collected could be diverse: from tweets, entries in social networks or directly from the website content that triggered the comments.
Our Dreamweaver extension focuses on that last option. "Comment System + Reviews Bubble" is a tool to publish the comments among the same content that generates them. This extension is formed by uniting two extensions distributed independently, "Comment System" and "Reviews Bubble". This 2 in 1 package represents a 10% discount compared to separate purchases of these two products. You save money and time.
Help & FAQ & Videos
Please, check this Comment System Demo (Animated Flash/Video)
Additional Info: Comment System + Reviews Bubble - Online FAQ.
Basic Installation
"Comment System + Reviews Bubble" can be installed by executing the CommentsBubbleReviews.mxp file or using the "Adobe Extension Manager" software.
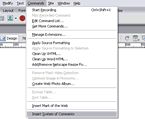
Once installed the extension can be accessed from
Development Notes
To use the Comment System extension, your Dreamweaver-based website must be configured and the webpage where you wish to insert a Comment System must be saved.
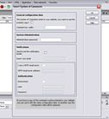
Click on the menu option “Comment System” (as explained under “Installation”). A setup window will open up, which will allow to prepare the Comment System to be inserted in the website.
If your website already has a Comment System on any of its pages, a checkbox will appear that will allow to use the same copy of the Comment System.Note: If you insert a new copy of the extension in your website, the one you used before will be overwritten and all previous setup data will be lost.
Comment Box Width: a whole number, that defines the width of the comment submission form, as well as the width of the box that will contain the comments on the webpage.
Administration password: select a password that you will use to enter the comment admin system.
Send me notification emails: this option must be selected if you wish to be notified of each of the comments entered in your webpages. The notification email will contain the submitted comment as well as the webpage address where the comment was entered.
Insert your email: enter here the email address where you want the notifications to be sent.
I use a SMTP email server: select this option if the webserver where your website is hosted uses a SMTP server for sending emails.
SMTP email server address: enter the location of your SMTP server.
Anonymous: mark this option if your SMTP server does not require authentication.
User: user name for authentication at the SMTP server (this field is only mandatory if your SMTP server requires authentication).
Password: password for authentication at the SMTP server (this field is only mandatory if your SMTP server requires authentication).
Note: if you are not sure of your email server parameters, please contact your hosting provider before adding a Comment System to your page.
A new folder – TE_CommentSystem - will be automatically created at the root of your website once you insert a Comment System. This new folder will contain all the necessary code for Comment System's correct functioning. It will also contain a folder named “db” (this folder must have writing permission), meant for the comment storage, and a folder named “admin”, with the code necessary for the administration of the comment system.
Note: because the “db” folder will have writing permission for creating a file for each webpage where a comment is added, each of these files will contain the comments submitted in the corresponding webpage.
To access the system admin of the comments please enter the following address: http://www.mywebsite.com/TE_CommentSystem/admin/SystemAdmin.php
(www.mywebsite.com depends on the name of your website)
The first thing you have to do when you wish to manage comments on your website is enter the password that you have selected in the setup window.
To manage the comments entered in the pages of your website, you must access the administration page: http://www.mywebsite.com/TE_CommentSystem/admin/SystemAdmin.php
(www.mywebsite.com depends on the name of your website)
Introduce the password that you selected in the setup window.
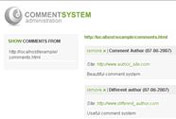
Once inside Admin, you can see on the left the list with all the pages that contain comments.
Once you select the page on the left, the comments of this webpage will be shown in the column on the right.
There is a button for elimination of each comment that belongs to a webpage. To delete a comment, simply click on that button, and after a confirmation dialogue, the comment will be eliminated.
To leave the Comment Admin, press Logout in the upper right corner.
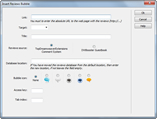
To use the "Reviews Bubble" extension, first click on the menu option

Link: The absolute URL of the webpage where the comments are inserted. (http://...)
Target: Select or enter where to open the linked page.
Reviews Source: Select the comments manager used in your web page. Comment managers currently compatible with Bubble are "Comment System" and "Guestbook".
Database Location: Location of the database with comments or reviews. Keep this field empty if you haven't changed the location of the database of the comment manager that you are using. Guestbook, as well as the Comment System, require the location of their databases to be clearly determined, if it has been changed, you will need to enter the new location.
Bubble Icon: Select the icon to be displayed.
Title: Enter the text to be displayed when the mouse is rolled over the button.
Access key: Enter a letter that will allow direct access to the button. In Windows it is achieved by pressing Alt + Letter, in Mac, Ctrl + Letter, when using a browser.
Tab index: Enter the number for the tab order.
If you wish to change any of the setup parameters, once Bubble is inserted into the web page, simply select the anchor inserted in the web page with the assigned class "Bubble" and change the attributes in the Properties Inspector.

The modified web page as well as the "bubble" folder, created by the extension, must be published onto your website.
Download Comment System + Reviews Bubble
|
Preferred payment & download method:
|
|
|
Paypal or Credit Cards: |
PRICE
After payment you will be redirected to a direct-download page and the download link will be emailed to the payment address.
USD $35.90 |